Here’s a base project for the Arty board based on the Artix-7 FPGA. The Arty is a nice little dev board because it’s low cost ($99 USD) but it’s still got enough power and connectivity to make it very useful. I really like the fact that the JTAG and UART are both accessed through the same USB connector, so I only need to connect one USB cable. I also like the fact that I can power it from the USB connector alone - provided I don’t connect too many power hungry PMods or an Arduino shield.
[Read More]Getting Started with the MYIR Z-turn
In this video I create a simple Vivado design for the MYIR Z-turn Zynq SoM and we run a hello world application on it, followed by the lwIP echo server. We connect the Z-turn to a network, then we use “ping” and “telnet” to test the echo server from a PC that is connected to the same network.
[Read More]Using AXI DMA in Vivado Reloaded
The DMA is one of the most critical elements of any FPGA or high speed computing design. It allows data to be transferred from source to memory, and memory to consumer, in the most efficient manner and with minimal intervention from the processor. It’s no wonder then that a tutorial I wrote three years ago about using the AXI DMA IP, is still relevant and still getting thousands of visits per month. I decided to remake that tutorial, this time as a video and using Vivado 2017.2 (just today they released Vivado 2017.3, doh!). Although I prefer doing written tutorials, I think that video tutorials can be very useful in their own way, and they’re a hell of a lot easier for me to produce. I hope you find this one useful.
[Read More]Tcl Automation Tips for Vivado and Xilinx SDK

Tcl automation is one of the most powerful features integrated into the Vivado and Xilinx SDK tools and should be fully exploited to maximize your productivity as an FPGA developer. In this post I’ve put together a “cheat sheet” of some of the most useful commands and tricks that you can use to get more done through Tcl scripting. If you want more things added to the list, please let me know in the comments section at the end.
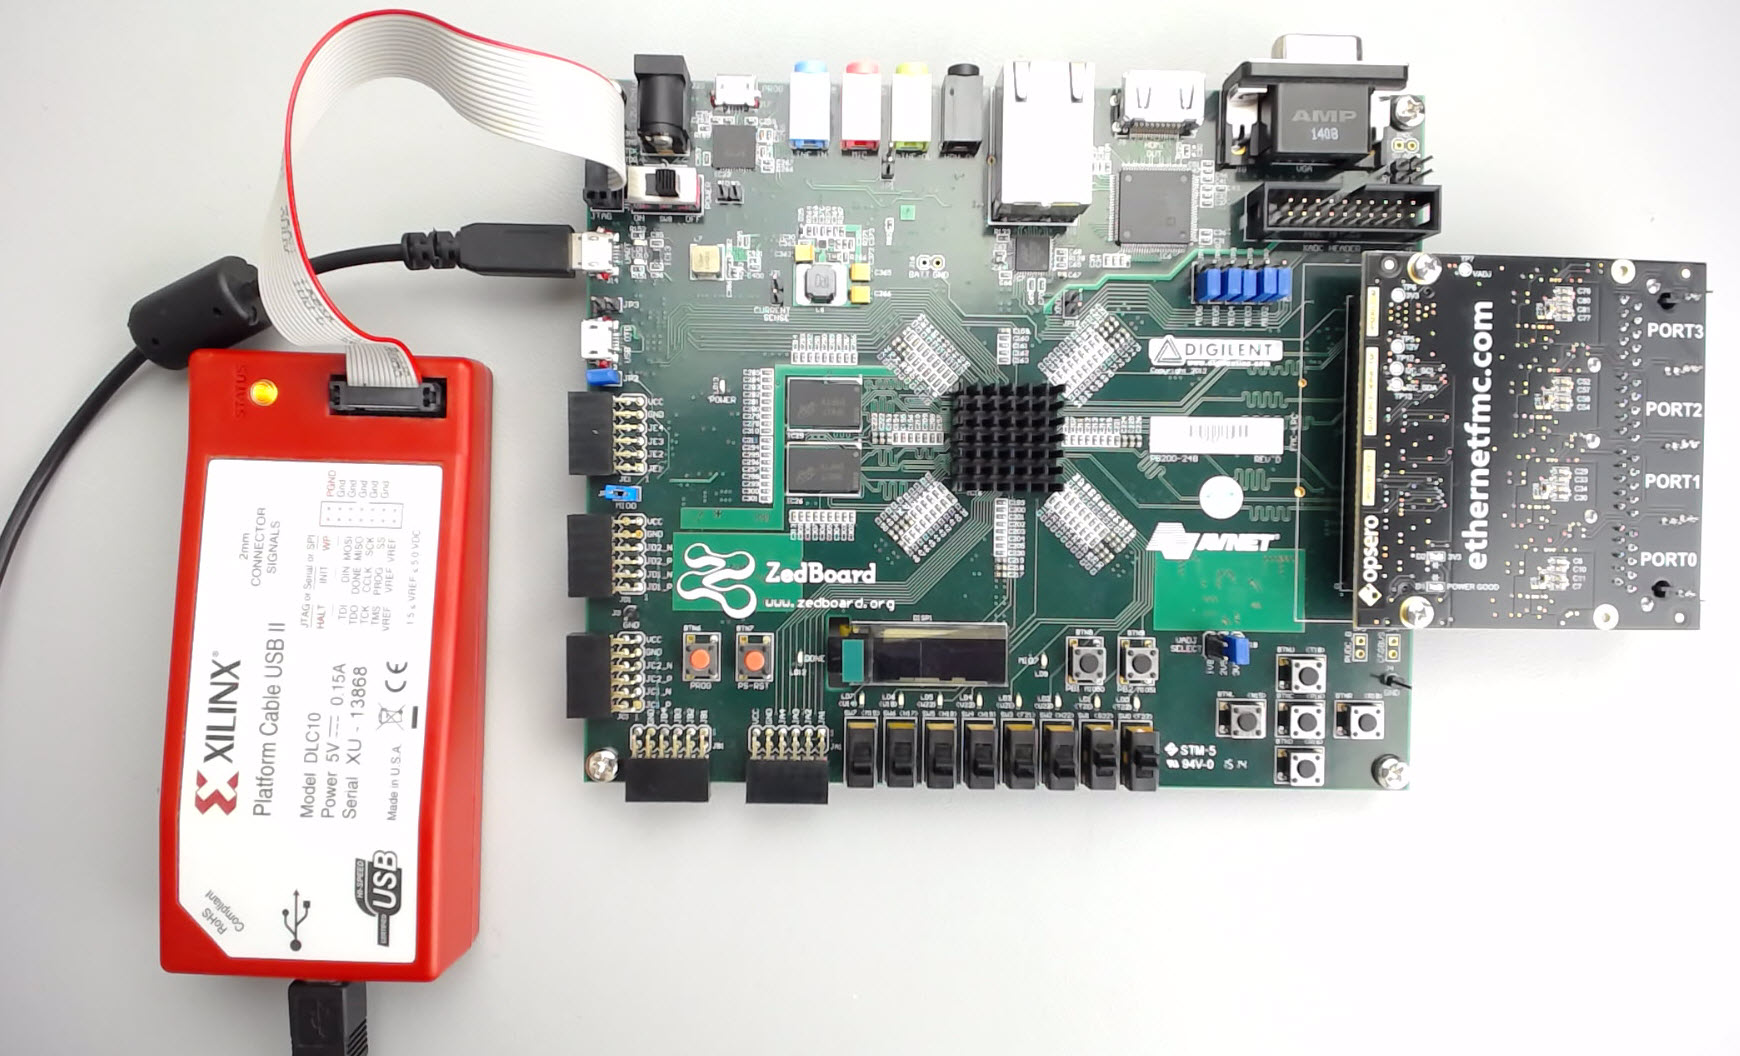
[Read More]Running a lwIP Echo Server on a Multi-port Ethernet design
Tutorial Overview
This tutorial is the follow-up to Using AXI Ethernet Subsystem and GMII-to-RGMII in a Multi-port Ethernet design. In this part of the tutorial we will generate the bitstream, export the hardware description to the SDK and then test the echo server application on our hardware. The echo server application runs on lwIP (light-weight IP), the open source TCP/IP stack for embedded systems. Our hardware platform is the Avnet ZedBoard combined with the Ethernet FMC.
[Read More]Using the AXI DMA in Vivado

Update 2017-10-10: I’ve turned this tutorial into a video here for Vivado 2017.2. In a previous tutorial I went through how to use the AXI DMA Engine in EDK, now I’ll show you how to use the AXI DMA in Vivado. We’ll create the hardware design in Vivado, then write a software application in the Xilinx SDK and test it on the MicroZed board (source code is shared on Github for the MicroZed and the ZedBoard, see links at the bottom).
[Read More]Modifying a BSP in Xilinx SDK
If ever you need to modify the BSP code in your Xilinx SDK project, keep two things in mind:
- Remember to re-build your application after the BSP has finished re-building. If you don’t re-build the software application, the .elf file will still contain the old BSP code and you wont see any change. Just re-save one of your application source files to get SDK to re-build your application.
- NEVER do a “clean” on the BSP after having modified it because Xilinx SDK deletes the BSP and re-builds them from the repository sources located in C:\Xilinx\14.7\ISE_DS\EDK\sw. If you need to do a “clean” without losing your code, then you will have to create your own BSP in the repository and work with those files, that way when you “clean”, the sources copied over will be your working files.
A couple of related forum posts:
[Read More]Create an application using the Xilinx SDK
In the previous tutorial titled Creating a project using Base System Builder, we used Xilinx Platform Studio (EDK) to create a hardware design (bitstream) for the Zynq SoC. In this tutorial, we will complete the design by writing a software application to run on the ARM processor which is embedded in the Zynq SoC. Using the Xilinx SDK, we’ll create a simple application that will send the words “hello world” out of the serial port and into your PC serial console. In the next tutorials, we’ll write some applications that will interact with the peripherals we defined in the EDK project.
[Read More]Write a software application with SDK
In the previous tutorial titled Creating a project using Base System Builder, we used the Embedded Development Kit (EDK) to create a hardware design composed of IP cores and a Microblaze soft processor. In this tutorial, we will complete the design by writing a software application to run on the Microblaze processor. In version 13.1, this is done using the Software Development Kit (SDK) and it is no longer “doable” in the EDK. To keep things simple, we’ll start off with a “hello world” application and then move onto one that will communicate with our peripherals. Specifically, we will read the DIP switch settings and display them on the terminal screen using printfs.
[Read More]