Title here
Summary here
Using Versal AI Edge Series VEK280
December 2, 202415 minutes

Hands down, the best solution for non-volatile storage on Versal designs, is NVMe solid-state drives. One of the main reasons why they are such a good fit is because they interface with the host device over PCI Express. Versal Prime, AI Core and AI Edge devices all have integrated PCIe blocks, and most of them are PCIe Gen5 compliant. This means that there are no extra IP costs to connect an NVMe SSD to the Versal devices because everything you need is already built into the device.
So the question everyone asks is: what read/write speeds can we expect to get from an NVMe SSD connected to a Versal device? The answer to this question depends heavily on whether you use a hardware-based NVMe accelerator IP or not. Hardware NVMe accelerators, such as the NVMe Streamer, typically cost thousands of dollars, but from what I’ve seen, you will get peak performance from them. However, given that these accelerators don’t fit everyone’s budget, I’m going to answer this question with a simpler but flexible setup that doesn’t use an accelerator. In this setup, NVMe is implemented by software that is built into the Linux operating system, and as such, it does not require any paid IP. Another advantage of this system is that you can operate the SSDs using well known Linux commands, and we have the benefit of a file system that is managed by the embedded operating system.
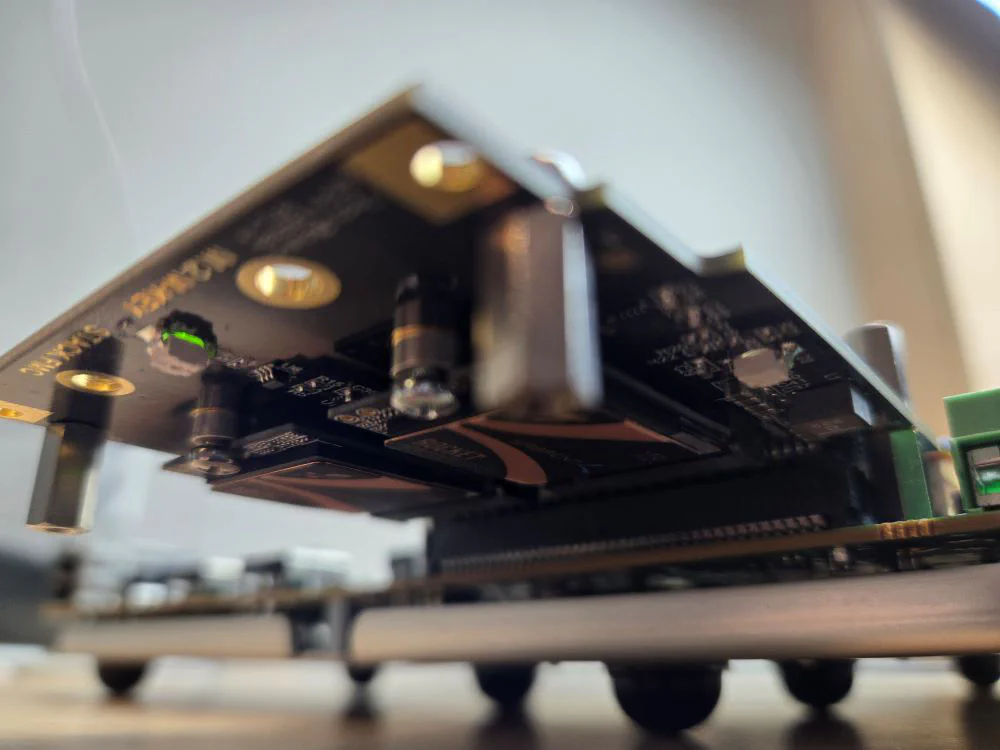
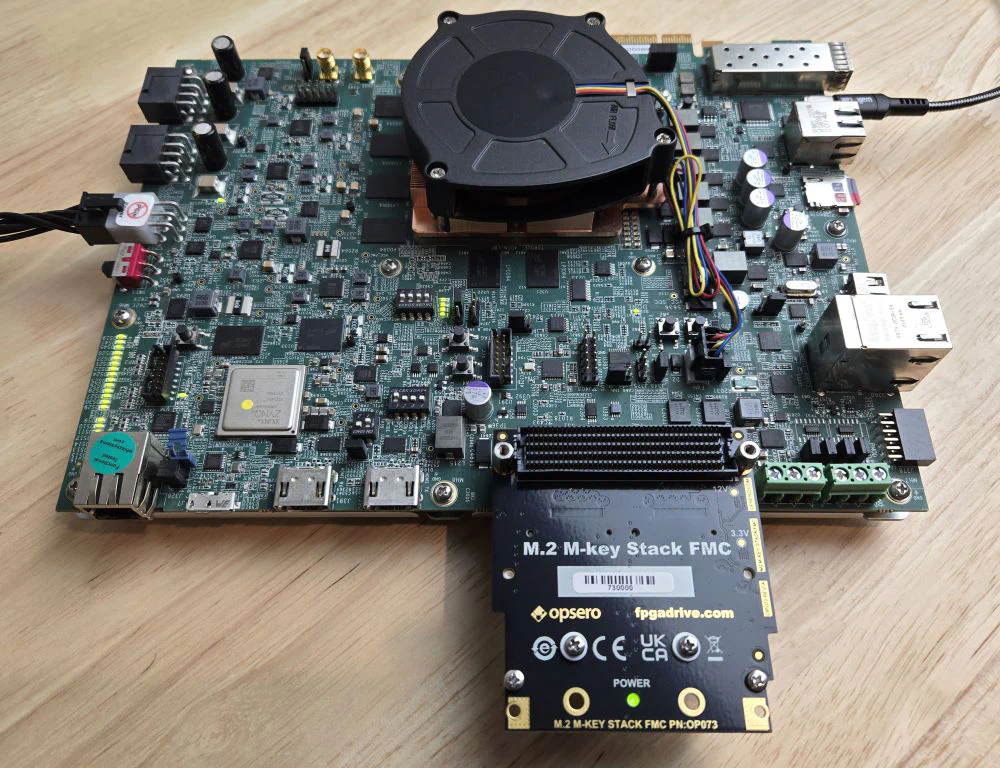
To perform the tests, I’ve connected 2x Sabrent Rocket 1TB NVMe SSDs to the VEK280, and I’ve run some bash scripts to exercise the SSDs in PetaLinux. To connect the SSDs to the eval board, I’ve used the Opsero M.2 M-key Stack FMC. For the Vivado/PetaLinux project I’ve used the reference design for that FMC card which is hosted on Github. I’ve made available the pre-built SD card disk images for a few different Versal boards, so that anyone can replicate these results on their own setup.
Let’s jump right into the speed test results and leave the rest of the post for those who want to replicate or understand how the tests were performed.
| Test | Read Speed | Write Speed |
|---|---|---|
| Single SSD | 2339 MBytes/s | 1208 MBytes/s |
| Dual SSD | 4420 MBytes/s | 2360 MBytes/s |
The “single SSD” tests involve reading/writing to a single SSD at a time. The “dual SSD” tests exercise two SSDs at a time. One interesting thing about the M.2 M-key Stack FMC is that it connects both SSDs to the Versal device through two independent GT quads and independent PCIe blocks, so the datapath of one does not impede the datapath of the other. As seen in the results, this allows us to (almost) double our effective read/write speeds, simply by accessing the SSDs through separate threads.
There we have the answer to our question, but to get some perspective, let’s make a few comparisons.
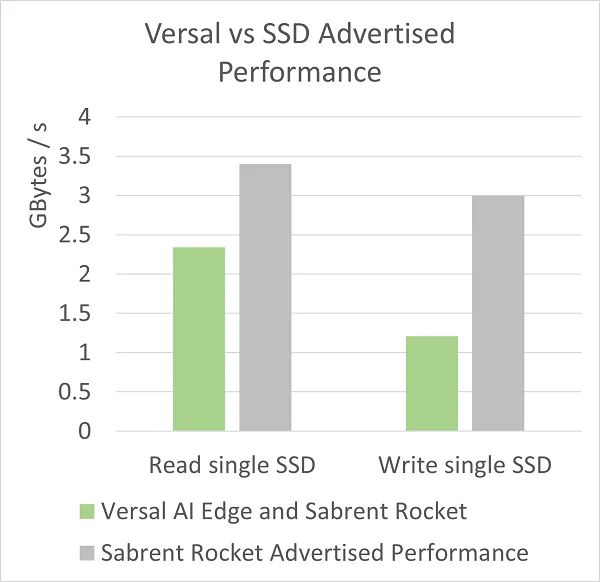
The table below shows the Sabrent Rocket SSD’s advertised performance. We’d need a hardware accelerator to get even close to these speeds, but if we consider those numbers to be the peak performance on a perfect test setup under ideal conditions, they at least give us an upper bound to compare our numbers to.
| SSD | Advertised Read Speed | Advertised Write Speed |
|---|---|---|
| Sabrent Rocket SSD | 3400 MBytes/s | 3000 MBytes/s |
The chart below compares the Sabrent Rocket SSD performance measured on the VEK280 to the manufacturer’s advertised performance.
Now let’s compare these results to those I obtained by performing the same test on the Zynq UltraScale+ a few years ago. Note that I used a different SSD with the Zynq UltraScale+, it was the Samsung 970 EVO.
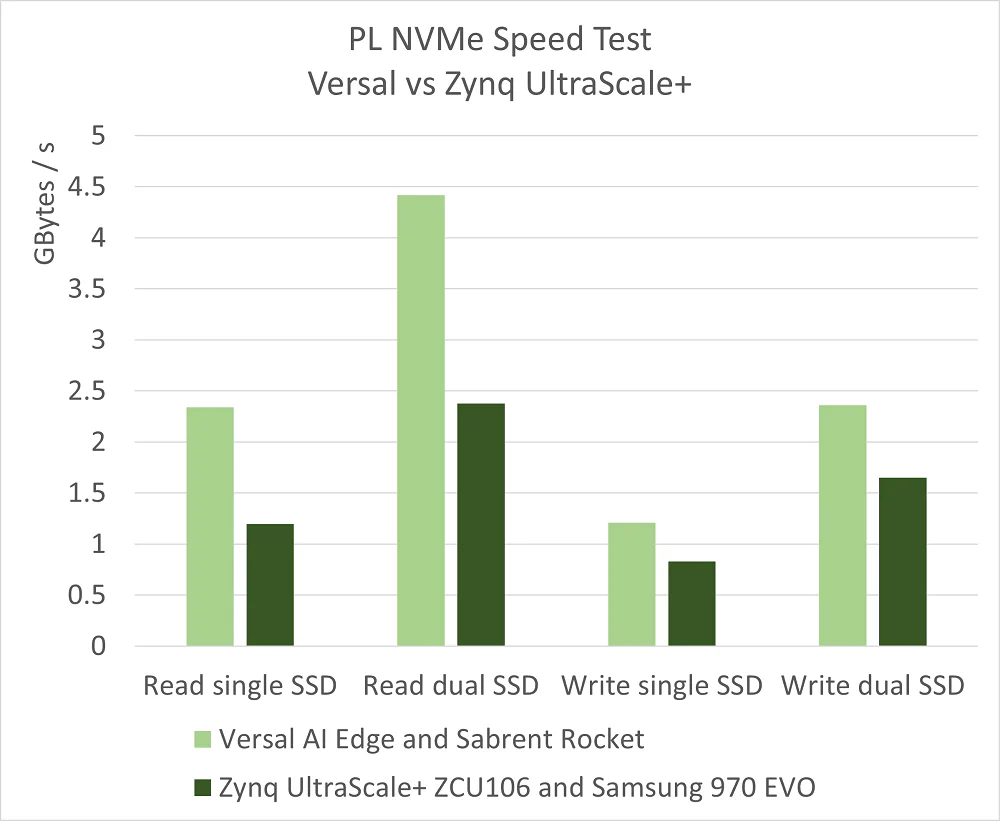
As you can see, the Versal setup achieved significantly better performance than the Zynq UltraScale+ setup. Allow me to speculate about the reasons behind the improved performance:
Now let’s go into how to do this yourself.
It’s worth noting that if you want to perform this test yourself, you can use either the M.2 M-key Stack FMC or the FPGA Drive FMC Gen4. Either of those FMC cards will work with this reference design, and both of them support PCIe Gen4.
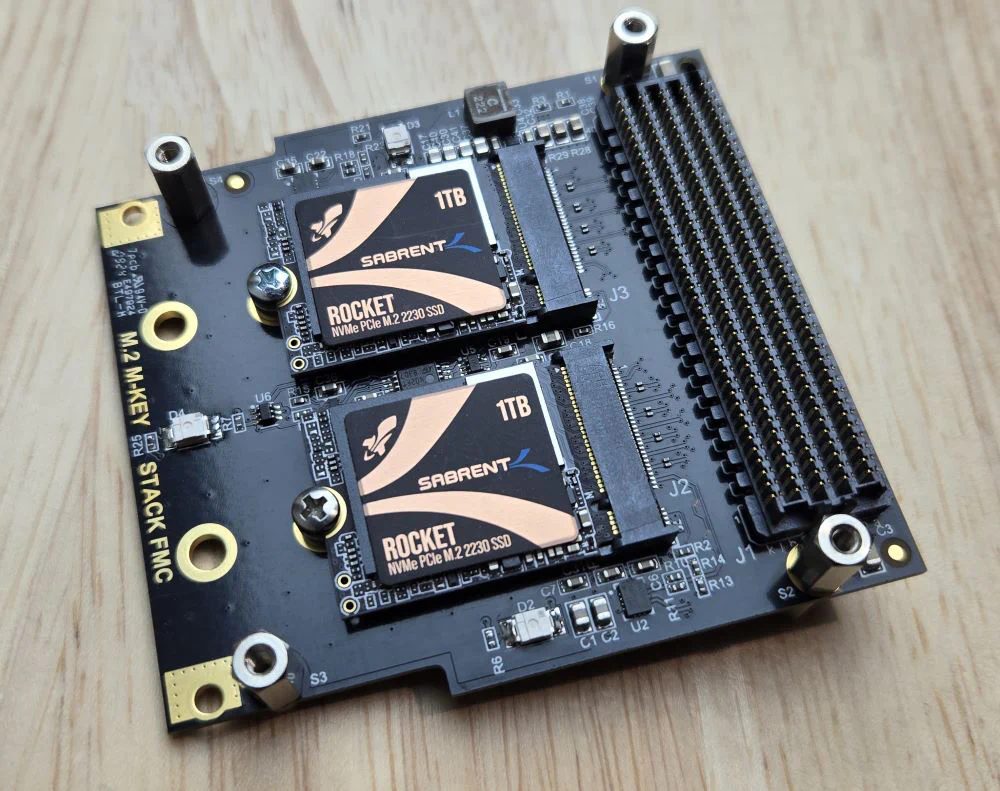
The first thing to do is to attach the NVMe SSDs to the M.2 slots on the M.2 M-key Stack FMC. Each SSD should be secured by a machine screw that is provided with the FMC card. It should look as shown in the image below:
With the SSDs secured, the M.2 M-key Stack FMC can be attached to the Versal eval board. You will also need to connect the power supply and the USB cable for the PetaLinux command line interface. Connect the other end of the USB cable to a PC on which you will run a UART terminal program. If you prefer to connect to the board via SSH, you can instead connect the Ethernet port of the eval board to your network router. In the case of the VEK280, the Ethernet port to use is the one that is right next to the USB connector, in the top right corner of the image below.
You might notice that the M.2 M-key Stack FMC has a carrier-side FMC connector on top - this can be used to connect a second FMC, such as the RPi Camera FMC or in fact any FMC that doesn’t need gigabit transceivers.
Now we will prepare the SD card to boot from. From the table below you can download the pre-built SD card image for the target board that you are using. You will need an SD card that is at least 16GB in size.
If instead you would like to build this design from sources, you can follow the build instructions from the ref design user guide.
| Versal board | FMC Connector | Pre-built SD card images |
|---|---|---|
| VCK190 | FMCP1 | VCK190 SD disk image |
| VMK180 | FMCP1 | VMK180 SD disk image |
| VEK280 | FMCP | VEK280 SD disk image |
| VHK158 | FMCP | VHK158 SD disk image |
| VPK120 | FMCP | VPK120 SD disk image |
| VPK180 | FMCP | VPK180 SD disk image |
.img file to your hard drive. 4. Eject the SD card from your PC and plug it into your Versal board.
petalinux. On your first time logging in, you will need to choose a password
and confirm it.To find the SSDs, we use the lsblk command:
vek280-fpgadrv-2024-1:~$ lsblk
NAME        MAJ:MIN RM   SIZE RO TYPE MOUNTPOINTS
mtdblock0    31:0    0     1M  0 disk
mtdblock1    31:1    0    22M  0 disk
mtdblock2    31:2    0   256K  0 disk
mmcblk0     179:0    0  29.7G  0 disk
|-mmcblk0p1 179:1    0     1G  0 part /run/media/boot-mmcblk0p1
`-mmcblk0p2 179:2    0  28.7G  0 part /
nvme0n1     259:0    0 953.9G  0 disk
nvme1n1     259:1    0 953.9G  0 disk
vek280-fpgadrv-2024-1:~$
From the above output, we can see that the SSDs have been recognized by PetaLinux but they haven’t been partitioned.
Before we can run the speed tests, we’ll have to partition the SSDs, so we use fdisk for this. Let’s start with the
first SSD:
vek280-fpgadrv-2024-1:~$ sudo fdisk /dev/nvme0n1

Welcome to fdisk (util-linux 2.38.1).
Changes will remain in memory only, until you decide to write them.
Be careful before using the write command.

Device does not contain a recognized partition table.
Created a new DOS disklabel with disk identifier 0x1116ea63.

Command (m for help):
In the fdisk menu, I need to do the following:
n for new partitionp and then 1 to create a new primary partitionw to write the data to diskCommand (m for help): n
Partition type
p primary (0 primary, 0 extended, 4 free)
e extended (container for logical partitions)
Select (default p): p
Partition number (1-4, default 1): 1
First sector (2048-2000409263, default 2048):
Last sector, +/-sectors or +/-size{K,M,G,T,P} (2048-2000409263, default 2000409263):
Created a new partition 1 of type 'Linux' and of size 953.9 GiB.
Command (m for help): w
The partition table has been altered.
C[ 5880.503950] nvme0n1: p1
alling ioctl() to re-read partition table.
Syncing disks.
[ 5880.515194] nvme0n1: p1
vek280-fpgadrv-2024-1:~$Now we need to get the name of the partition that we just created by running lsblk:
vek280-fpgadrv-2024-1:~$ lsblk
NAME        MAJ:MIN RM   SIZE RO TYPE MOUNTPOINTS
mtdblock0    31:0    0     1M  0 disk
mtdblock1    31:1    0    22M  0 disk
mtdblock2    31:2    0   256K  0 disk
mmcblk0     179:0    0  29.7G  0 disk
|-mmcblk0p1 179:1    0     1G  0 part /run/media/boot-mmcblk0p1
`-mmcblk0p2 179:2    0  28.7G  0 part /
nvme0n1     259:0    0 953.9G  0 disk
`-nvme0n1p1 259:3    0 953.9G  0 part
nvme1n1     259:1    0 953.9G  0 disk
vek280-fpgadrv-2024-1:~$
From that output I can see that the partition was named nvme0n1p1. Now I can create a file system
on that partition using sudo mkfs -t ext2 /dev/nvme0n1p1.
vek280-fpgadrv-2024-1:~$ sudo mkfs -t ext2 /dev/nvme0n1p1
Password:
mke2fs 1.46.5 (30-Dec-2021)
Discarding device blocks: done
Creating filesystem with 250050902 4k blocks and 62513152 inodes
Filesystem UUID: cbaea2b8-4ff9-47c5-b65d-f812d95fd2ca
Superblock backups stored on blocks:
        32768, 98304, 163840, 229376, 294912, 819200, 884736, 1605632, 2654208,
        4096000, 7962624, 11239424, 20480000, 23887872, 71663616, 78675968,
        102400000, 214990848

Allocating group tables: done
Writing inode tables: done
Writing superblocks and filesystem accounting information: done

vek280-fpgadrv-2024-1:~$
Now we can create a directory for the partition and mount it to that directory:
vek280-fpgadrv-2024-1:~$ sudo mkdir /run/media/nvme0n1p1
vek280-fpgadrv-2024-1:~$ sudo mount /dev/nvme0n1p1 /run/media/nvme0n1p1/
[ 6183.932088] EXT4-fs (nvme0n1p1): mounting ext2 file system using the ext4 subsystem
[ 6183.975784] EXT4-fs (nvme0n1p1): mounted filesystem cbaea2b8-4ff9-47c5-b65d-f812d95fd2ca r/w without journal. Quota mode: none.
vek280-fpgadrv-2024-1:~$
We’ll need to repeat these steps for the second SSD, and once that’s done we should have two SSDs
partitioned and mounted to the system. We can check this with lsblk:
vek280-fpgadrv-2024-1:~$ lsblk
NAME        MAJ:MIN RM   SIZE RO TYPE MOUNTPOINTS
mtdblock0    31:0    0     1M  0 disk
mtdblock1    31:1    0    22M  0 disk
mtdblock2    31:2    0   256K  0 disk
mmcblk0     179:0    0  29.7G  0 disk
|-mmcblk0p1 179:1    0     1G  0 part /run/media/boot-mmcblk0p1
`-mmcblk0p2 179:2    0  28.7G  0 part /
nvme0n1     259:0    0 953.9G  0 disk
`-nvme0n1p1 259:3    0 953.9G  0 part /run/media/nvme0n1p1
nvme1n1     259:1    0 953.9G  0 disk
`-nvme1n1p1 259:2    0 953.9G  0 part /run/media/nvme1n1p1
vek280-fpgadrv-2024-1:~$
We take note of the mount points for each of the SSDs, because we will need them to run the speed tests:
/run/media/nvme0n1p1/run/media/nvme1n1p1Just so you know, the next time you boot PetaLinux with these SSDs plugged in, they will automatically be mounted to the directories I used in this example.
The bash scripts to run the speed tests are built into the PetaLinux projects, and you can find them in the /usr/bin
directory. That directory is also in the path, so you can call the scripts from anywhere. Note that you must run the
write tests before running the read tests, because the write tests create the file(s) to be read by the read tests.
| Source code | Usage |
|---|---|
| single_write_test.sh | sudo single_write_test.sh <path-to-ssd-mount> |
The single SSD write test writes a 4GB file to the SSD, and waits for the write to complete before calculating the time taken and the effective write speed. The script has one argument: the path of the mount location of the SSD to write to. Here is the output that I get:
vek280-fpgadrv-2024-1:~$ sudo single_write_test.sh /run/media/nvme0n1p1/
Single SSD Write:
  - Data:  4000 MBytes
  - Delay: 3.31 seconds
- Speed: 1208.46 MBytes/s| Source code | Usage |
|---|---|
| single_read_test.sh | sudo single_read_test.sh <path-to-ssd-mount> |
The single SSD read test reads the 4GB file from the SSD, and waits for the read to complete before calculating the time taken and the effective read speed. This script also needs an argument specifying the mount location of the SSD to read from. Here is the output that I get:
vek280-fpgadrv-2024-1:~$ sudo single_read_test.sh /run/media/nvme0n1p1/
Single SSD Read:
  - Data:  4000 MBytes
  - Delay: 1.71 seconds
- Speed: 2339.18 MBytes/s| Source code | Usage |
|---|---|
| dual_write_test.sh | sudo dual_write_test.sh <ssd1-mount> <ssd2-mount> |
The dual SSD write test does the same as the single write test, however it runs the test on both SSDs, each on a separate thread. This script requires two arguments, specifying the mount locations of the SSDs to test. Below is the output that I get:
vek280-fpgadrv-2024-1:~$ sudo dual_write_test.sh /run/media/nvme0n1p1/ /run/media/nvme1n1p1/
Dual SSD Write:
  - Data:  8000 MBytes
  - Delay: 3.39 seconds
- Speed: 2359.88 MBytes/s| Source code | Usage |
|---|---|
| dual_read_test.sh | sudo dual_read_test.sh <ssd1-mount> <ssd2-mount> |
The dual SSD read test does the same as the single read test, however it runs the test on both SSDs, each on a separate thread. This script requires two arguments, specifying the mount locations of the SSDs to test. Below is the output that I get:
vek280-fpgadrv-2024-1:~$ sudo dual_read_test.sh /run/media/nvme0n1p1/ /run/media/nvme1n1p1/
Dual SSD Read:
  - Data:  8000 MBytes
  - Delay: 1.81 seconds
- Speed: 4419.89 MBytes/sThat’s all there is to the test, but while we’re here, you might want to know what the PCIe link speed is. We can do this
using sudo lspci -vv. Below I have passed the output through egrep just to show the relevant information:
vek280-fpgadrv-2024-1:~$ sudo lspci -vv | egrep ':00.0|LnkSta:'
0000:00:00.0 PCI bridge: Xilinx Corporation Device b0b4 (prog-if 00 [Normal decode])
                LnkSta: Speed 16GT/s, Width x4
0000:01:00.0 Non-Volatile memory controller: Phison Electronics Corporation Device 5021 (rev 01) (prog-if 02 [NVM Express])
                LnkSta: Speed 16GT/s, Width x4
0001:00:00.0 PCI bridge: Xilinx Corporation Device b0b4 (prog-if 00 [Normal decode])
                LnkSta: Speed 16GT/s, Width x4
0001:01:00.0 Non-Volatile memory controller: Phison Electronics Corporation Device 5021 (rev 01) (prog-if 02 [NVM Express])
                LnkSta: Speed 16GT/s, Width x4
vek280-fpgadrv-2024-1:~$
On my setup we can see that the Sabrent SSDs have linked up at PCIe Gen4 speeds (16GT/s x 4 lanes).
dd to measure NVMe performance as we’re doing here can give us a ballpark figure for read/write speed, but how
confident can we be in the results? What are the factors influencing the results? The throughput measured with dd can
vary significantly as we change the input parameters used (eg. block size and block count). What parameters should
we be using? A better solution would be to use a benchmarking tool that is built for the purpose
of measuring what we need to measure, such as
sysbench. I’ll use this tool in
a future post.If you’re trying this out for yourself, and you’re using a different Versal board or SSD, I’d really like to hear about your results. If you would like to share them, please email me with details about your setup.